In the world of electronics fabrication and repair, the skill of ‘how do you solder wires to a circuit board’ is critical. Whether you are experimenting with simple circuits or assembling complex electronic devices, high quality soldering is the key to stable circuit operation!
The cornerstone of a high-quality solder joint is thorough preparation. Please follow the steps below to systematically handle the wires and the circuit board to lay a solid foundation for subsequent soldering:
- Cut the wires accurately
Cut the stranded or solid wire to the target length using wire cutters according to the design requirements and leave an extra 3-5 mm (approx. 1/8‘-1/5’) for adjustment when inserting into the circuit board holes. - Fine Stripping of Insulation
Use wire strippers or special tools to strip 1/4‘ (approx. 6mm) to 1/2’ (approx. 12mm) of insulation from the end of the wire, the process should be handled carefully to avoid damage to the internal core structure. - Pre-tinning of wire ends
Through the soldering iron in the wire ends evenly covered with a thin layer of solder, this step can optimise the efficiency of heat transfer, and to ensure that the formation of solder joints between the metal fusion to reduce the risk of false soldering. - PCB Deep Cleaning
Use a dust-free cloth or cotton swab moistened with isopropyl alcohol (IPA) to thoroughly wipe the circuit board pads and holes to remove surface grease, dust, and oxidation to ensure a clean soldering surface. - Fix the board firmly
Clamp the circuit board in a vise or special fixture, keep the horizontal state, to avoid welding process due to shaking caused by component misplacement or welding point offset. - Precise positioning of components
Insert all passive components (e.g. resistors, capacitors) and active components (e.g. chips, connectors) into the corresponding holes accurately according to the design drawings in advance and use tweezers to fix them with slight pressure. - Thermal component protection
Install aluminium or ceramic heat sinks within 1cm around the soldering point to prevent high temperature from causing irreversible damage to thermal components (e.g. electrolytic capacitors, IC chips). - Pre-soldering Ultimate Inspection
After confirming that all wires have been tinned, the board is clean and dry, and components are positioned accurately, you can proceed to the soldering stage. Good preparation can make the soldering process efficient and accurate, and significantly improve the quality of the solder joints.
Optimisation tips
Use a magnifying glass to check the flatness of the pads to avoid poor soldering due to oxidation or warpage of the pads.
Plan the soldering sequence in advance and prioritise temperature-sensitive components to reduce the risk of thermal damage.
Tools and Materials Required to Solder Wires to Circuit Boards
Core soldering tools
Soldering iron: A necessary tool for the precise transfer of heat to melt the solder.
It is recommended to choose 300-400°C adjustable temperature soldering iron, suitable for different soldering needs.
When soldering wires, it is recommended to use a 1-2mm fine-tipped soldering iron tip; if you need to solder heavy components, a thicker tip is required to increase the heat capacity.
Solder wire: The core material of the solder, used to fill the solder joint and form the electrical connection.
Standard rosin-cored 0.5-1mm wire is a popular choice, as it flows well and does not oxidise easily.
Lead-free solder requires a higher temperature soldering iron and it is recommended to adjust the temperature setting according to the type of solder.
Auxiliary Tools and Consumables
Soldering iron stand and cleaning sponge
Soldering iron stand: Safe storage of hot soldering iron to prevent burns or damage to the worktable.
Cleaning sponge: Regularly wipe the iron head to remove oxidised layer and replenish solder to maintain soldering efficiency.
Flux and Cleaner
Flux: Remove the oxide film on the metal surface and promote the wetting and flow of solder.
Isopropyl Alcohol (IPA): Cleans circuit boards after soldering, removes residual flux and prevents corrosion.
Safety and Protective Equipment
Personal Protective Equipment (PPE)
Safety glasses: Prevent eye damage from solder splatter or hot melt.
Ventilated environment: Ensure air circulation in the operation area to reduce the risk of inhalation of soldering fumes.
Advanced tools (optional)
Tweezers: Hold wires or tiny components to enhance soldering precision.
Wire cutters: Trim wires to precise lengths to avoid unwanted threads.
Soldering helper (third hand): Holds circuit boards in place, freeing up both hands for operation.
Smoke evacuator: active extraction of soldering fumes to optimise the working environment.
Desoldering Braid: Quickly removes incorrectly soldered components and reduces board damage.
Tool Expansion Suggestions
Beginners can start from the basic tools, and gradually add professional equipment according to the needs of the project.
Regular maintenance of tools (e.g. tinning of soldering iron tips, replacement of cleaning sponges) can prolong the service life and ensure the quality of soldering.
With the right mix of tools and materials, combined with safe practices, the task of soldering wires to circuit boards can be completed efficiently.
How to solder wires to a circuit board
Cut the wires and clean the copper foil
Cut the wires to be soldered and clean the copper foil on the board with sandpaper or a wire brush. This will help to make the wires fit more tightly to the circuit board, thus improving the quality of the soldering.
Arranging the wires onto the board
Before soldering the wires to the circuit board, arrange and secure the wires in the position where they need to be accessed. This will help you better connect the wires to the circuit board.
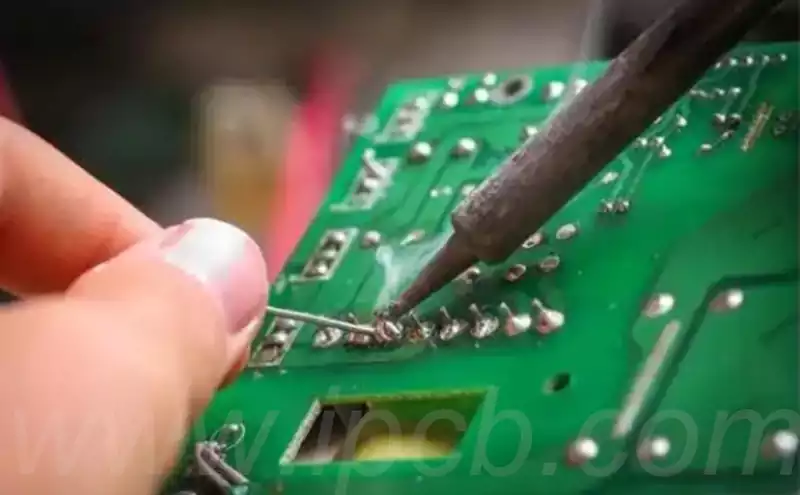
Soldering Wires to the Board
Grab your soldering iron, keep the tip clean, light the iron with the soldering wire and gently press the wire onto the board. When the soldering iron is hot, then gently place it on top of the wire for a few seconds until the solder wire dissolves. At this point, the wire will be tightly bonded to the circuit board.
Checking the soldering results
Once the soldering is complete, check that the connection between the wire and the circuit board is good and check for any false soldering or other problems. Make sure that there are no short circuits in the soldering, and that there are no problems such as poor contact.